Quills
Sourcing, Curing & Cutting – 2026.06.06
Many historical scripts and modern variants owe much of their form and technique to the quill pen and its capabilities. With this in mind, I took up the challenge of learning to make quills from scratch last summer. It was not easy, nor yet very successful, but it has been incredibly valuable and enjoyable. If you have any interest in historical penmanship, working with quills is relevant and fascinating. This is an account of my first attempts nearly a year ago, and could also serve as a guide to getting started with this art.
- Part 1: Harass the Waterfowl
- Part 2: Preparation
- Part 3: Clarification
- Part 4: Cutting
- Next Steps & Further Reading
Part 1: Harass the Waterfowl
There is an infestation of Canada Geese in my local park. Normally, I would complain. However, goose feathers are widely regarded as the prime source for quills. Geese molt annually in the summer, dropping their flight feathers. The few most external of these, known as the primaries, are what we want for quills due to their size and strength.1 A couple of trips around the ponds in the blistering Texas heat were enough to stock me with around one hundred feathers to work with.
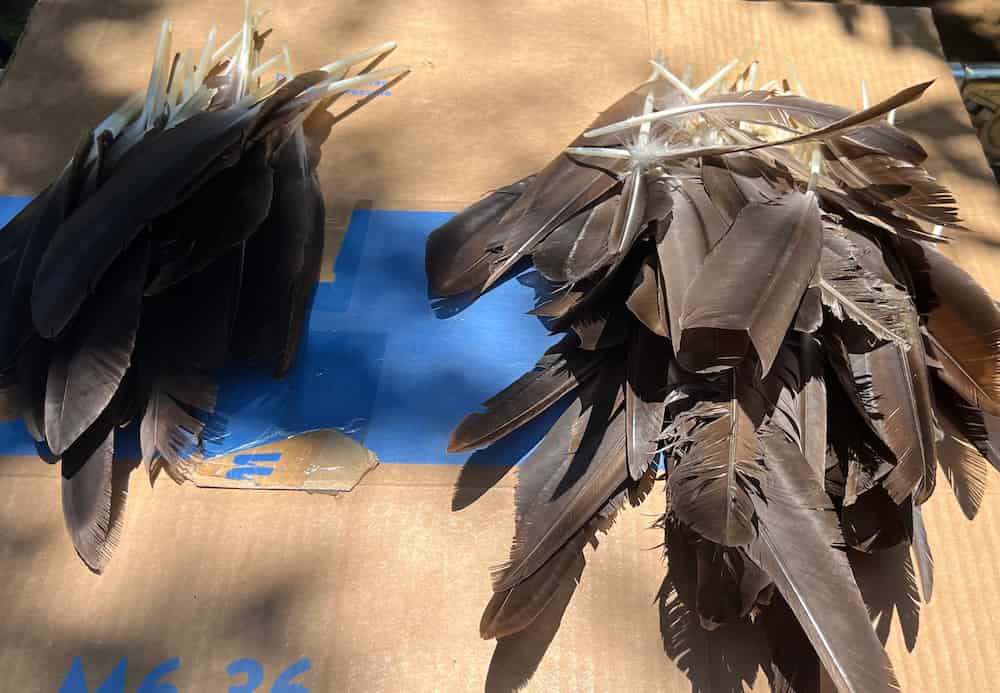
If you are lucky enough to have access to a park like mine, it should go without saying that you should only collect feathers that can be reached without disturbing the birds. You should also check your local laws concerning the collection of feathers. They can carry pests and diseases, so be careful and clean. For each feather, you’ll want to check the barrel (the bottom, featherless part of the shaft) for cracks or misshapenness and leave any of those behind.
Most people probably don’t have access to molting geese, so I’ll mention that John Neal Books sells “White Goose Quills, Uncut Uncured” for $1.50 each as of 2026, if you’re in the United States. I would avoid buying the pre-cut or pre-cured feathers, since you won’t be able to control the process. Turkey feathers are also used for quills and should be available online, though I haven’t used them.
Part 2: Preparation
If you’re collecting feathers from molting birds in the park, you may want to clean your feathers before continuing. Since I collected so many, I washed them in a large batch with a bucket of soapy water and left them to dry in the sun. This is not strictly necessary for the making of a decent quill, but I personally want my writing tools to be free of dirt, grime, and goose poop.
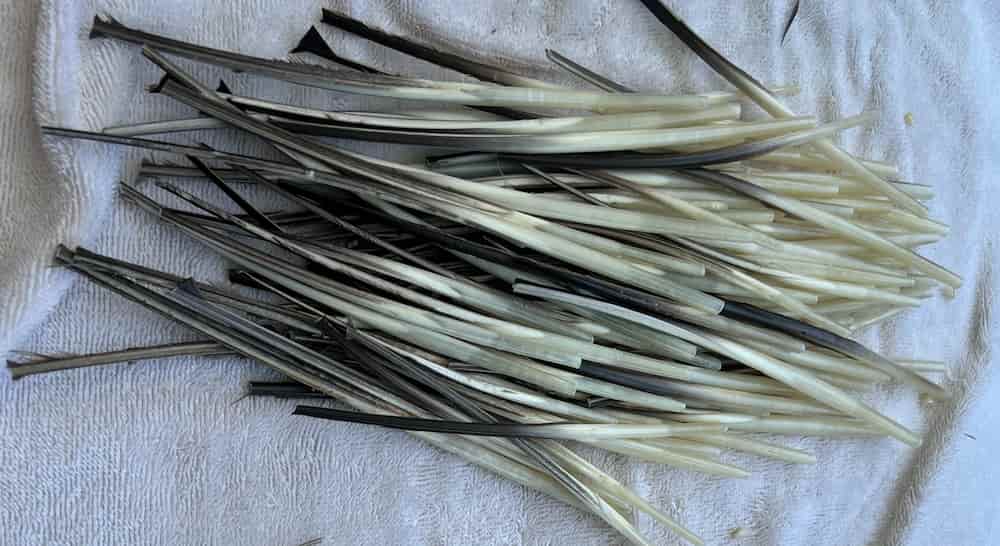
To avoid making unwieldy quills, I cut away some of the barb end, leaving around eight inches. Wire cutters gave me the cleanest cuts. I then trimmed the end of the barrel enough to expose the inside of the feather for cleaning. With a small crochet hook or similar implement, you can scoop out the inner membrane of the feather.
The next step is to remove the barbs. Although a voluminous and flowing quill is appealing, the barbs, especially those near the hand, can be a nuisance. If you want to keep some barbs anyway, you should at least remove anything near your grip. It is common to see one side of the feather clipped away, or a small amount of barbs left around the top of the feather. They can sometimes be pulled away easily, though you may need some assistance with a knife. I found that as I tore away the barbs, I would sometimes pull a ‘hangnail’ into the barrel. To keep it clean for writing, snip the strand with a knife when this happens.
Part 3: Clarification
So far, it might seem that making a quill is cake. The curing process, sometimes called clarification, changes things.
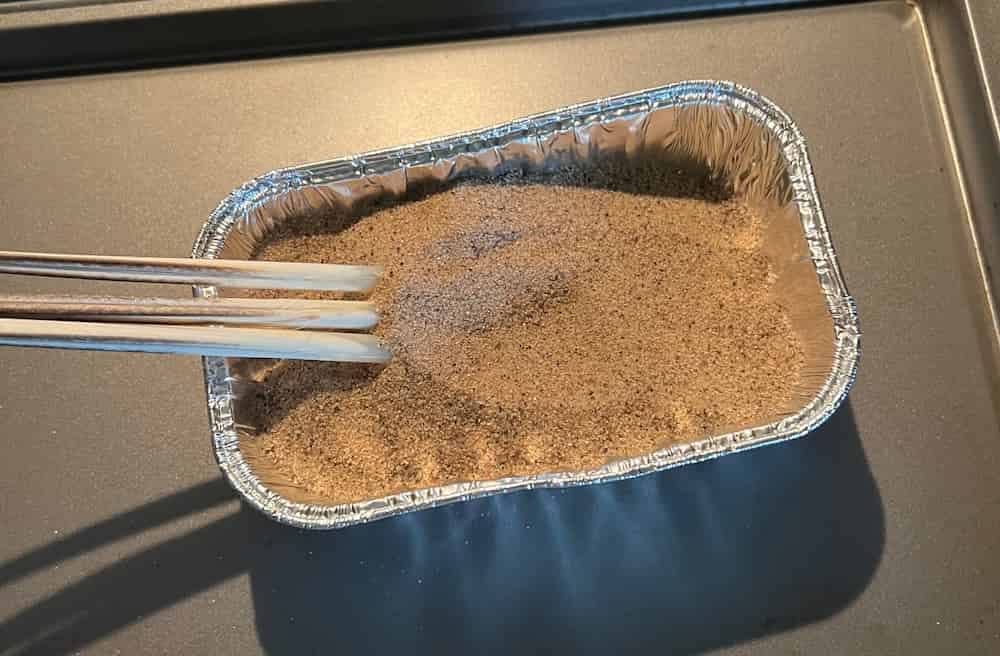
The natural texture of the feather is too soft for writing. A quill cut from an uncured feather will dull and lose shape much too quickly to be usable for reliable and consistent work. The solution is to dry the feather, making it harder and more brittle. One easy method involves leaving the quill to dry naturally in the sun or a warm place. A quicker and more systematic method called tempering involves inserting the feathers into hot sand for up to a few minutes. There are other methods, notably dutching, which uses a heated metal rod inserted within the barrel, but tempering with hot sand is what was most accessible for me and the most common.
Before heating the sand, I soaked the quills in a cup of water the night before. I read that this is necessary for the tempering to work well, but I haven’t tested this.2
Donald Jackson, whose excellent guide I’ve followed, recommends using the finest possible sand. I had moderate success with a coarse gardening sand anyway. Two to three inches in a shallow dish or pot on the stove or in the oven, respectively, works well. Use pure metal cookware without coatings, since these may burn from the dry heat. It does not smell pleasant. I heated the sand to around 300°F in an aluminum dish in the oven.
The soaking feathers should be removed and dried. Cut a small (around 1 cm long) angled opening into the end of the barrel to create a scoop. This will make it easier to funnel sand into the feather. You may want to use a sharp knife for precision instead of the wire cutters (more on knives in Part 4).
With the hot sand ready, use a spoon to fill the inside of the feather, then insert the barrel into the sand. At 300°, I kept the feathers under the sand for around two minutes. There is no single time and temperature to use, and this is something that can only be discovered by experimentation. You are looking for the barrel of the feather to become translucent and rigid. When we go to cut the slit in Part 4, the now brittle feather should naturally split along its length.
While the feather is still warm from the sand, it may be possible to reshape the barrel to be larger and flatter by inserting a metal rod or hook.3 This is a component of Norman Brown’s modern ‘Dutching’ technique. I have yet to make an attempt, but it is high on my list of things to try, especially since goose feathers tend to be elliptical with the minor axis parallel to the writing edge. This limits the maximum width of the nib.
Part 4: Cutting
Now that we have dried and hardened our feather, we only need to cut it into a usable quill pen.
The tool of choice should be a small knife, thin and sharp. Ideally, we could use a dedicated pen knife, like masters in the past. You can find vintage or antique ones if lucky, or shop custom-made from Yoke Pen Company and others. A well-made pen knife has a large ergonomic grip, a curved blade, and one rounded outer edge for smoother scooping cuts.4 For me, and actually the preference of Paul Antonio, an X-Acto knife is a decent substitution, and saves time otherwise spent sharpening.5
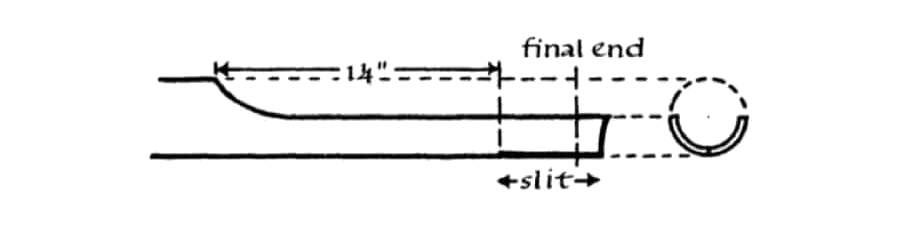
Knife in hand, the first step is to cut a slit for ink flow. At this point, we may be grateful for our hard work at the oven, as the brittle feather should practically split itself. To determine where the slit should be placed, we need to orient the feather correctly and see where it lies in the hand. On the bottom side of the quill will be a line running the length of the shaft. Hold the quill with that side facing down as if you were to write. Having identified the writing edge, we want to insert our knife into the barrel with the blade facing the top edge. Pushing the base of the blade into the upper edge of the quill using the leverage against the bottom edge, split the feather. If it cracks easily, straight, and clean, this is our sign that the tempering was done well.6
You can also skip this step and add the slit with a different method after forming the shape of the pen. I haven’t yet decided if I prefer one method to the other.
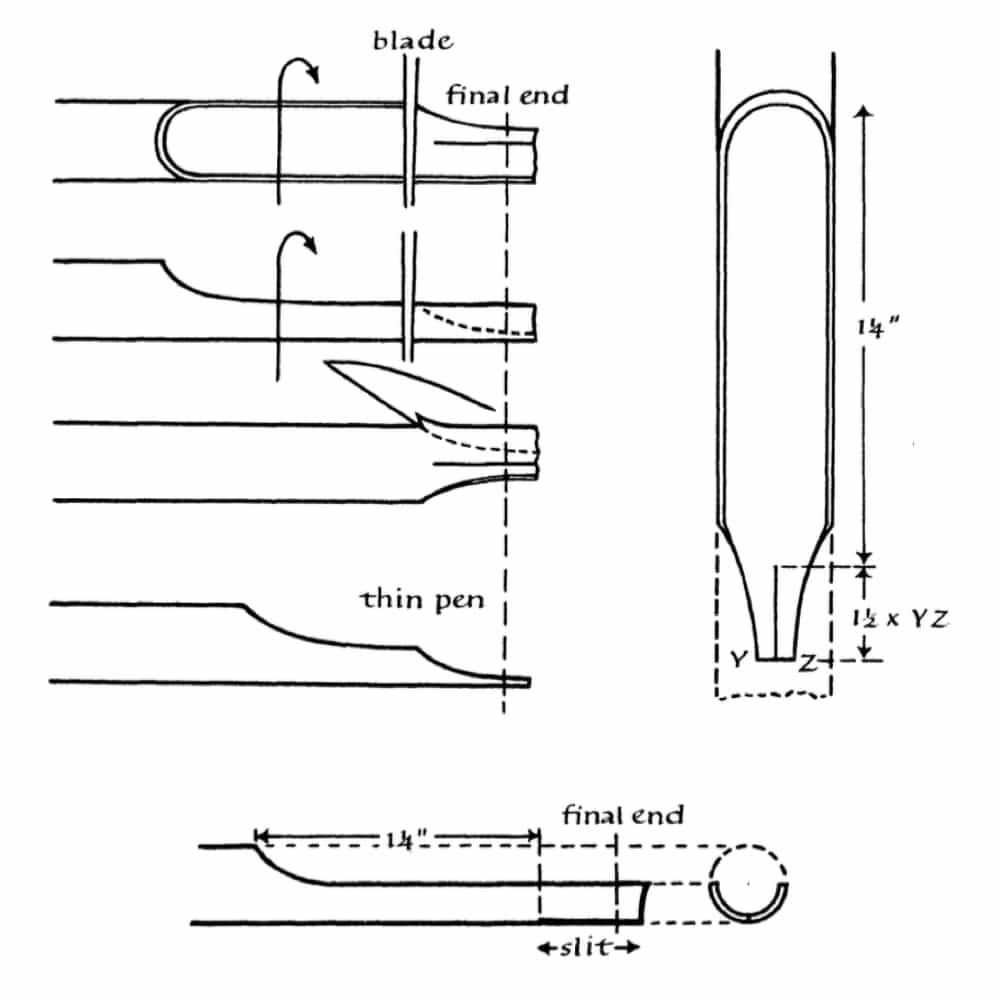
Continuing to form the shape of the quill, we will make three main cuts. When I was learning these cuts, Jackson’s guide was extremely helpful, so I’ll be utilizing a few of his most useful diagrams to illustrate my directions. And because I can’t do it well enough yet!
The first cut is a large scooping cut from the underside of the pen. Start back around an inch and a half from the tip of the feather and cut down and out through the length of the barrel. Observe the shape in the diagram, how the scoop quickly levels out and then continues straight to the end. I have been doing this as a push cut, but it could also be done as a pull. Jackson describes using the latter, but it seems to me this might be more difficult to keep straight, though perhaps more controlled. You could also make the cut straighter at first and pare material away in multiple cuts to get the right shape. In any case, the scoop is probably not going to make or break the quill, though the rest will.
The next goal is to form the shoulders of the pen one at a time. The cut should begin around one-fourth of the previous cut’s length from the tip. With a paring motion similar in shape to the scooping cut, carve away the outside of the feather, narrowing towards the slit and ending nearly parallel to it. This is the most difficult cut for me. I tend to cut too much and overshoot the slit.
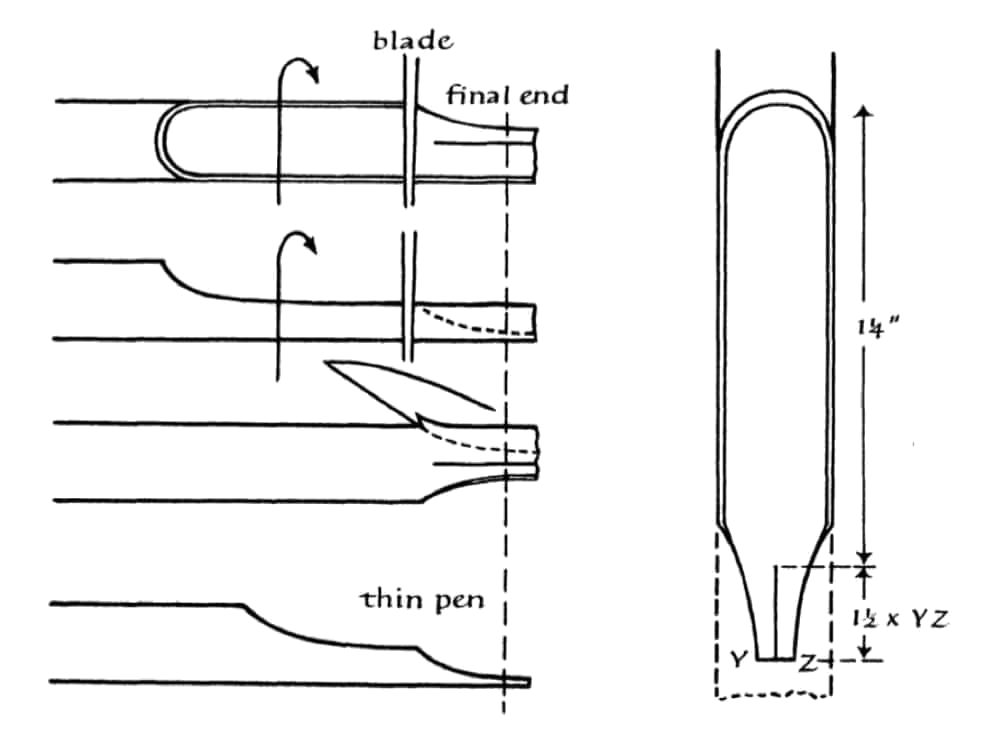
If the forming of the slit was skipped previously, we could instead introduce it to the shaped quill now. With the end of the quill upside down on a hard surface, we can crack the feather by pressing down with our knife. Jackson and Brown call this the guillotine method. It reminds me of using a knife to break up peanut brittle. This could be easier than trying to carve the pen carefully around an existing slit, especially where too much pressure in the wrong direction can easily cause the slit to widen or the tines to separate.
The final step, finishing the nib, is much less difficult. We want to flatten the top and bottom of the writing edge by shaving away any jutting material. If the edge is too round so that only the two ends of the arc touch the paper, the edge is too broad. You should go back a step and cut more from the shoulders. This is where reshaping the barrel might have been useful. Once we have the desired width on a flush edge, rest the nib, inside down, on a solid surface. Finish the nib with a single chop at a slight angle away and down from the top of the quill. This gives a sharp and even writing edge for penning clean letters.
Many adjustments to this process might be made for different writing conditions, scripts, and goals. For example, we can cut a wider pen, which requires some lengthening of the slit and sometimes a second slit entirely.9 We can make the shoulders broader or narrower to adjust ink flow. You could even try to make the tines thin and flexible, and in that case, good luck. A different ink or paper may need a different pen, and no matter what conditions, you will need to constantly sharpen and recut the pen.
There is no end to learning this skill once you start.
Next Steps & Further Reading
The impetus for this project was not to make a tool for broad edge lettering in the expected sense, but rather to gain insight into the traditional way of writing roundhand. It is a common misconception that English Roundhand and similar scripts were written with a pointed pen. Most writers of modern “copperplate” or “roundhand” do use flexible pointed pens, but this is not the traditional way. In reality, Roundhand was written with a unique rotation between the edge and the corner of the quill. As described in the Young Clerk’s Assistant, first published ca. 1733:
Make the Nib of your Pen for the Round & Round-Text Hands the breadth of the full Stroke—Make All Your Body-Strokes with the Full, & all Hair-Strokes with the corner of Your Pen. 10
Though my current results are nowhere near good enough for quality work, even my worst quills give a fascinating hint of how to use this traditional technique.
As I continue to work on my quills, I hope to be able to write more about my experiments and discoveries, especially in the context of Roundhand. I’d like to explore Brown’s dutching technique, test the guillotine method, and try to vary the order of some of the steps. I’ve been wondering if I could cut the entire shape of the quill before curing it and finish with the slit. These are things to look out for in future posts.
If you’re curious to learn more about the process, including more on ink and paper choice, details on the curing and cutting process, and amazing diagrams, please read Donald Jackson’s article, “Preparation of Quills and Reeds.” This is easily the best source on the subject, and I’ve cited it frequently in writing this. Equally rich are the vast number of copybooks from the 16th to 19th centuries, which sometimes contain diagrams or instructions. Happy studies!
Donald Jackson, “Preparation of Quills and Reeds,” in The Calligrapher’s Handbook, ed. Heather Child (1986), 15–16. ↩︎
Jackson, 17. ↩︎
Jackson, 19. ↩︎
“Quills and Quill Knives,” Patricia Lovett MBE, https://www.patricialovett.com/quills-and-quill-knives/. ↩︎
PAScribe, “How to cut a Quill,” December 1, 2015, YouTube, 2:43–3:17, https://www.youtube.com/watch?v=QW3To0iuTpw&t=445. ↩︎
Jackson, 23–24. ↩︎
Jackson, illus. 10. (non-transparent) ↩︎
Jackson, illus. 14–15. ↩︎
Jackson, 30. ↩︎
The Young Clerk’s Assistant; Or, Penmanship Made Easy, Instructive and Entertaining: Being a Compleat Pocket-Copy-Book, Neatly Engrav’d for the Practice of Youth in the Art of Writing. W. Lowndes, 1787. https://books.google.com/books?id=GAVQAAAAYAAJ. ↩︎